We start the causal-learn tutorial series by getting oriented: what the library does, what assumptions causal discovery methods rely on, how graph outputs should be read, and how to run a small smoke test that confirms the environment is ready.
causal-learn is mainly a causal discovery library. It helps estimate candidate graph structure from observational or interventional data. That makes it different from DoWhy and EconML: those libraries are usually used after the causal question or graph structure has been specified. Discovery is earlier and more assumption-sensitive, so the tutorial series will repeatedly emphasize diagnostics, stability, and cautious language.
Orientation and Learning Goals
By the end, you should be able to:
Verify that causal-learn is installed and importable from the current environment.
Understand the main algorithm families exposed by the library.
Explain the difference between discovery, identification, and effect estimation.
Recognize common graph outputs such as DAGs, CPDAGs, PAGs, skeletons, and partially oriented edges.
Generate a small synthetic dataset with a known causal graph.
Run a first PC algorithm smoke test and compare the learned graph to the known graph.
Save tables and figures in the same output style as the other tutorial folders.
Dataset and Experiment Setup
This opening lesson is an orientation to causal-learn, so the examples are deliberately compact. They expose workflow mechanics and assumptions before richer applied analyses. They show how the package represents data, models, graphs, estimands, estimators, diagnostics, and saved outputs before the later lessons use richer designs.
When a small dataset appears here, read it as a smoke test for the workflow and a way to locate where assumptions enter. The important experiment is procedural: can the environment run, can the objects be created, and can the reader see where assumptions will enter in later lessons?
Mathematical Foundation
Causal discovery starts from a structural view of the data. A directed acyclic graph \(G\) represents parent sets \(\operatorname{pa}(X_j)\), and a structural equation model writes each variable as
\[
X_j = f_j\{\operatorname{pa}(X_j)\} + \varepsilon_j, \qquad \varepsilon_j \perp\!\!\!\perp \varepsilon_k \text{ for } j \neq k.
\]
When the graph is causally sufficient and Markov, it implies the factorization
The learned graph should be read as a claim about this factorization and its implied independences, as more than a visual object.
causal-learn Orientation and Setup
How This Tutorial Fits the Series
The rest of the causal-learn lessons will go deep into specific algorithm families. Lesson 00 gives the shared vocabulary and environment checks those lessons will reuse.
A useful way to think about the series is:
Early lessons teach graph objects, synthetic data, and independence tests.
Final lessons focus on benchmarking, stability, an end-to-end case study, and reporting limitations.
The important mindset is that discovered graphs are usually candidate structures whose causal interpretation depends on assumptions, diagnostics, and domain review.
Setup
The code below imports core packages, configures plotting, creates output folders, and checks whether causal-learn is importable. The package is installed under the Python module name causallearn, even though the package name is written as causal-learn.
# Build and label the diagnostic visualization for the Setup section.from pathlib import Pathimport osimport platformimport sysimport warningsfrom importlib import metadatafrom importlib.util import find_specNOTEBOOK_DIR = Path.cwd()if NOTEBOOK_DIR.name !="causal_learn": NOTEBOOK_DIR = Path("notebooks/tutorials/causal_learn").resolve()OUTPUT_DIR = NOTEBOOK_DIR /"outputs"FIGURE_DIR = OUTPUT_DIR /"figures"TABLE_DIR = OUTPUT_DIR /"tables"for directory in [FIGURE_DIR, TABLE_DIR, OUTPUT_DIR /"matplotlib_cache"]: directory.mkdir(parents=True, exist_ok=True)os.environ.setdefault("MPLCONFIGDIR", str((OUTPUT_DIR /"matplotlib_cache").resolve()))warnings.filterwarnings("ignore", category=FutureWarning)warnings.filterwarnings("ignore", message=".*The default value of.*")warnings.filterwarnings("ignore", message=".*IProgress not found.*")import numpy as npimport pandas as pdpd.set_option("display.max_colwidth", None)pd.set_option("display.max_columns", None)pd.set_option("display.width", 0)import networkx as nximport matplotlib.pyplot as pltimport seaborn as snsfrom scipy import statsfrom sklearn.preprocessing import StandardScalertry:import causallearn CAUSAL_LEARN_AVAILABLE =Truetry: CAUSAL_LEARN_VERSION = metadata.version("causal-learn")except metadata.PackageNotFoundError: CAUSAL_LEARN_VERSION =getattr(causallearn, "__version__", "available")exceptExceptionas exc: causallearn =None CAUSAL_LEARN_AVAILABLE =False CAUSAL_LEARN_VERSION =f"not available: {exc}"RANDOM_STATE =20260430rng = np.random.default_rng(RANDOM_STATE)NOTEBOOK_PREFIX ="00"sns.set_theme(style="whitegrid", context="notebook")plt.rcParams["figure.dpi"] =120pd.set_option("display.max_columns", 100)pd.set_option("display.float_format", lambda value: f"{value:,.4f}")print(f"Python: {sys.version.split()[0]}")print(f"causal-learn importable: {CAUSAL_LEARN_AVAILABLE}")print(f"causal-learn version/status: {CAUSAL_LEARN_VERSION}")print(f"Notebook directory: {NOTEBOOK_DIR}")
If causal-learn importable is True, the environment can run the live examples in this lesson. If it is False, the tables and explanatory sections still make sense, but the algorithm cells should be rerun after installing causal-learn.
Package Version Snapshot
Causal discovery results can be sensitive to software versions, especially when graph classes, scoring functions, and independence tests change. The code below records the core package versions used by the tutorial run.
# Define reusable helpers for the Package Version Snapshot section.def package_version(package_name):""" Idea: Look up a package version and report a readable fallback when the package is unavailable. Parameters ---------- package_name : object Python package whose installed version is being checked. Returns ------- str Installed package version, or a readable unavailable marker when the package is not installed. """try:return metadata.version(package_name)except metadata.PackageNotFoundError:return"not installed"version_table = pd.DataFrame( [ {"package": "python", "version": platform.python_version(), "role": "Runtime."}, {"package": "causal-learn", "version": package_version("causal-learn"), "role": "Causal discovery algorithms."}, {"package": "numpy", "version": package_version("numpy"), "role": "Numerical arrays and simulation."}, {"package": "pandas", "version": package_version("pandas"), "role": "Tabular data handling."}, {"package": "scipy", "version": package_version("scipy"), "role": "Statistical utilities."}, {"package": "scikit-learn", "version": package_version("scikit-learn"), "role": "Scaling and helper models."}, {"package": "networkx", "version": package_version("networkx"), "role": "Graph visualization."}, {"package": "matplotlib", "version": package_version("matplotlib"), "role": "Static plotting."}, {"package": "seaborn", "version": package_version("seaborn"), "role": "Statistical plotting."}, ])version_table.to_csv(TABLE_DIR /f"{NOTEBOOK_PREFIX}_package_versions.csv", index=False)display(version_table)
package
version
role
0
python
3.11.15
Runtime.
1
causal-learn
0.1.4.5
Causal discovery algorithms.
2
numpy
2.4.4
Numerical arrays and simulation.
3
pandas
3.0.2
Tabular data handling.
4
scipy
1.17.1
Statistical utilities.
5
scikit-learn
1.6.1
Scaling and helper models.
6
networkx
3.6.1
Graph visualization.
7
matplotlib
3.10.9
Static plotting.
8
seaborn
0.13.2
Statistical plotting.
The package snapshot is a small reproducibility habit. When a discovered graph changes after an environment update, this table helps separate methodological changes from software changes.
Causal Discovery Concepts
Before using causal-learn, it is important to separate three related tasks: discovering graph structure, identifying an estimand, and estimating an effect. causal-learn mainly helps with the first task.
task
typical_question
typical_output
common_tools
Causal discovery
Which variables may be directly connected in a causal graph?
Candidate DAG, CPDAG, PAG, or partially oriented graph.
causal-learn, Tetrad, Tigramite, gCastle.
Identification
Given a graph and assumptions, what estimand identifies the causal effect?
Backdoor, frontdoor, IV, mediation, or other estimand.
DoWhy, graphical criteria, domain reasoning.
Effect estimation
How large is the effect, and how does it vary across units?
This distinction keeps expectations healthy. Discovery can suggest candidate structure, but a discovered graph still needs domain review before it becomes the basis for effect estimation or decisions.
Library Capability Map
causal-learn includes several families of methods. This table gives a high-level map so later lessons have a shared reference point.
family
examples
core_idea
best_when
Constraint-based discovery
PC, FCI, CD-NOD
Use conditional independence tests to remove and orient edges.
The conditional independence test is well matched to the data and sample size is adequate.
Score-based discovery
GES, exact search
Search over graph structures using a decomposable score such as BIC or BDeu.
A scoring assumption is credible and the variable set is not too large for the search strategy.
Functional causal models
LiNGAM, ANM, PNL
Use functional or noise assumptions to identify causal direction beyond Markov equivalence.
Linearity, non-Gaussianity, additive-noise, or post-nonlinear assumptions are scientifically plausible.
Permutation-based discovery
GRaSP, BOSS
Search over variable orderings or permutations that imply graph structures.
Ordering-based search is computationally feasible and useful for the graph size.
Hidden causal representation
GIN
Use constraints designed for latent causal structure and hidden variables.
The problem is explicitly about hidden structure rather than only observed-variable DAGs.
Time-series discovery
Granger-style tools, VAR-LiNGAM
Use lagged temporal structure to separate past causes from future outcomes.
Variables are measured repeatedly and temporal ordering is meaningful.
The method family should be chosen from assumptions, diagnostics, and the scientific question. For example, FCI is more appropriate than PC when latent confounding is plausible, while LiNGAM needs stronger functional assumptions than PC.
Import Capability Check
The code below tests whether the main modules used in the series can be imported. It catches missing optional components early. Full method behavior still depends on the dataset and assumptions.
Discovery under nonstationary or heterogeneous data.
3
GES
causallearn.search.ScoreBased.GES
True
Greedy score-based graph search.
4
ExactSearch
causallearn.search.ScoreBased.ExactSearch
True
Exact score-based search for small graphs.
5
LiNGAM
causallearn.search.FCMBased.lingam
True
Linear non-Gaussian functional causal models.
6
ANM
causallearn.search.FCMBased.ANM.ANM
True
Additive-noise model tools.
7
PNL
causallearn.search.FCMBased.PNL.PNL
True
Post-nonlinear model tools.
8
GRaSP
causallearn.search.PermutationBased.GRaSP
True
Permutation-based discovery.
9
BOSS
causallearn.search.PermutationBased.BOSS
True
Permutation-based discovery.
10
GIN
causallearn.search.HiddenCausal.GIN.GIN
True
Hidden causal representation discovery.
11
GraphUtils
causallearn.utils.GraphUtils
True
Graph output utilities.
The available modules form the practical menu for the rest of the tutorial. Some algorithms may still require extra assumptions, careful preprocessing, or smaller datasets even when the import succeeds.
Core Assumptions to Track
Causal discovery methods are assumption-heavy. The next table collects assumptions that will appear repeatedly across the series.
assumption
plain_language
why_it_matters
Causal Markov condition
A variable is independent of its non-effects after conditioning on its direct causes.
It links graph separation to statistical independence patterns.
Faithfulness
Observed independencies come from the graph structure, not exact parameter cancellation.
Constraint-based methods can miss or add edges when faithfulness fails.
Causal sufficiency
There are no unobserved common causes among the measured variables.
PC relies on this more strongly than FCI-style methods.
Independent and identically distributed rows
Rows are sampled from the same stable distribution without temporal dependence.
Standard tabular tests can fail when data are time dependent or nonstationary.
Correct test or score choice
The independence test or score matches the data type and distribution well enough.
A poor test can produce a poor graph even when causal assumptions are reasonable.
No major measurement leakage
Variables are measured at the intended time and exclude future information.
Leaky variables can create predictive-looking graph structure that is causally invalid.
A graph output is only as credible as the assumptions behind it. Later lessons will make these assumptions concrete by changing data-generating processes and watching graph recovery change.
Graph Vocabulary
Discovery outputs often preserve uncertainty through partially directed graphs. This vocabulary table will make later outputs easier to read.
term
short_name
meaning
DAG
Directed acyclic graph
A graph with directed edges and no directed cycles.
Skeleton
Adjacency pattern
The undirected edge structure before directions are considered.
V-structure
Collider pattern
A pattern like A -> C <- B where A and B are not adjacent.
CPDAG
Completed partially directed acyclic graph
Represents a Markov equivalence class of DAGs.
PAG
Partial ancestral graph
Represents possible ancestral relations when hidden confounding may exist.
Circle endpoint
Unresolved edge mark
Used in PAGs when orientation is not fully determined.
Markov equivalence
Same independence model
Different DAGs can imply the same observed conditional independencies.
SHD
Structural Hamming distance
A graph-difference count used in benchmarks.
The key idea is that uncertainty in edge direction is normal. A partially oriented graph is often the honest output, not a failure.
For causal discovery, the result is a statement about recoverable structure under assumptions, not a free-standing proof of cause and effect.
Synthetic DAG Smoke Test
The first executable example uses a small known DAG with six variables. We keep the graph simple enough to inspect by eye but rich enough to include a collider and downstream pathways.
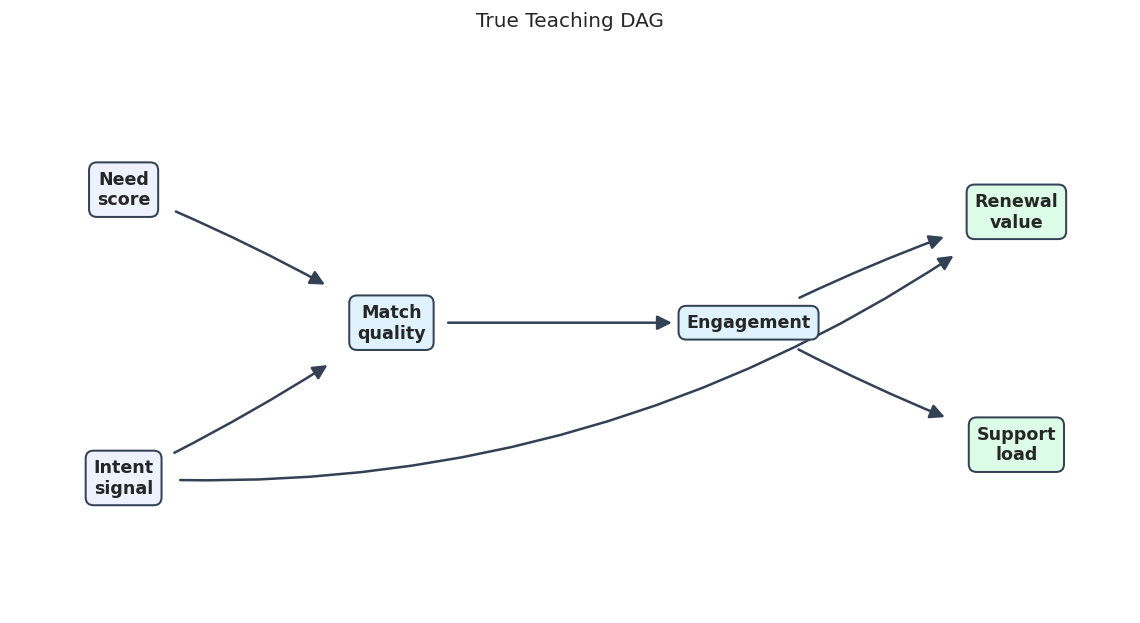
The graph says that need and intent both affect match, match drives engagement, and engagement affects later renewal and support outcomes. This is a example graph, not a claim about a real product system.
Draw the True DAG
A fixed layout makes it easier to compare the true graph and the learned graph later. The arrows in this figure represent the data-generating structure used by the simulation.
# The causal-learn tutorial uses the same DAG visual language as the DoWhy# tutorial: wide white canvas, rounded pastel boxes, bold labels, and dark# annotation arrows. Drawing arrows manually keeps arrowheads clear of boxes.node_positions = {"need": (0.10, 0.76),"intent": (0.10, 0.24),"match": (0.34, 0.52),"engagement": (0.66, 0.52),"renewal": (0.90, 0.72),"support": (0.90, 0.30),}node_labels = {"need": "Need\nscore","intent": "Intent\nsignal","match": "Match\nquality","engagement": "Engagement","renewal": "Renewal\nvalue","support": "Support\nload",}node_colors = {"need": "#eef2ff","intent": "#eef2ff","match": "#e0f2fe","engagement": "#e0f2fe","renewal": "#dcfce7","support": "#dcfce7",}edge_radii = { ("need", "match"): -0.04, ("intent", "match"): 0.04, ("match", "engagement"): 0.00, ("engagement", "renewal"): -0.04, ("engagement", "support"): 0.04, ("intent", "renewal"): 0.18,}def draw_teaching_style_graph(edge_table, title, path, edge_radii=None):""" Draw a causal graph using the shared tutorial DAG style. Parameters ---------- edge_table : pd.DataFrame Table of source-target edges and endpoint marks to convert, draw, or score. title : str Title shown above the plot. path : str or pathlib.Path Optional output path for the figure. edge_radii : dict or None Optional curvature settings for individual plotted edges. Returns ------- None Draws the example graph directly on the Matplotlib axes. """ edge_radii = edge_radii or {} fig, ax = plt.subplots(figsize=(12, 6)) ax.set_xlim(0, 1) ax.set_ylim(0, 1) ax.set_axis_off()for row in edge_table.itertuples(index=False): source = row.source target = row.target edge_type =getattr(row, "edge_type", "directed") directed = edge_type =="directed" ax.annotate("", xy=node_positions[target], xytext=node_positions[source], arrowprops=dict( arrowstyle="-|>"if directed else"-", color="#334155", linewidth=1.5, mutation_scale=18, shrinkA=34, shrinkB=46, linestyle="-"if directed else"--", connectionstyle=f"arc3,rad={edge_radii.get((source, target), 0.0)}", ), zorder=1, )for node, (x, y) in node_positions.items(): ax.text( x, y, node_labels[node], ha="center", va="center", fontsize=10.5, fontweight="bold", bbox=dict( boxstyle="round,pad=0.45", facecolor=node_colors[node], edgecolor="#334155", linewidth=1.2, ), zorder=2, ) ax.set_title(title, pad=18) fig.savefig(path, dpi=160, bbox_inches="tight") plt.show()true_graph_edge_table = pd.DataFrame( [{"source": source, "target": target, "edge_type": "directed"} for source, target in true_graph.edges()])true_dag_path = FIGURE_DIR /f"{NOTEBOOK_PREFIX}_true_teaching_dag.png"draw_teaching_style_graph(true_graph_edge_table, "True Teaching DAG", true_dag_path, edge_radii=edge_radii)
This figure is the benchmark. The PC smoke test below will try to recover the graph from simulated samples, but it will only see the data matrix, not this diagram.
Generate Synthetic Data from the DAG
The code below simulates continuous variables from linear structural equations with Gaussian noise. That choice is deliberate: it matches the assumptions of the Fisher-Z conditional independence test used by the PC smoke test.
The simulated data are friendly to PC by construction: continuous, linear, acyclic, causally sufficient, and sampled from one stable distribution. Later lessons will relax these conditions.
PC Algorithm Smoke Test and Takeaways
Data Field Summary
Even synthetic data should have a small data dictionary. This table records what each variable represents in the worked example.
field
graph_role
description
need
Root cause
Baseline user need for help or guidance.
intent
Root cause
Early intent or motivation signal.
match
Intermediate variable
How well available content or options match the user’s needs.
engagement
Intermediate variable
Observed engagement generated from match quality.
renewal
Downstream variable
Later value or renewal proxy affected by intent and engagement.
support
Downstream variable
Support burden affected by engagement patterns.
The field summary also reminds us that causal discovery algorithms do not know semantic roles. They only see statistical patterns. Human review is still required.
Basic Data Checks
Before discovery, inspect shape, missingness, and simple distribution summaries. Conditional-independence tests can behave badly when the data contain missing values, extreme outliers, or incompatible data types.
The dataset is complete and numeric, which is exactly what the first smoke test expects. Real datasets usually need more careful preprocessing before discovery.
Correlation Heatmap
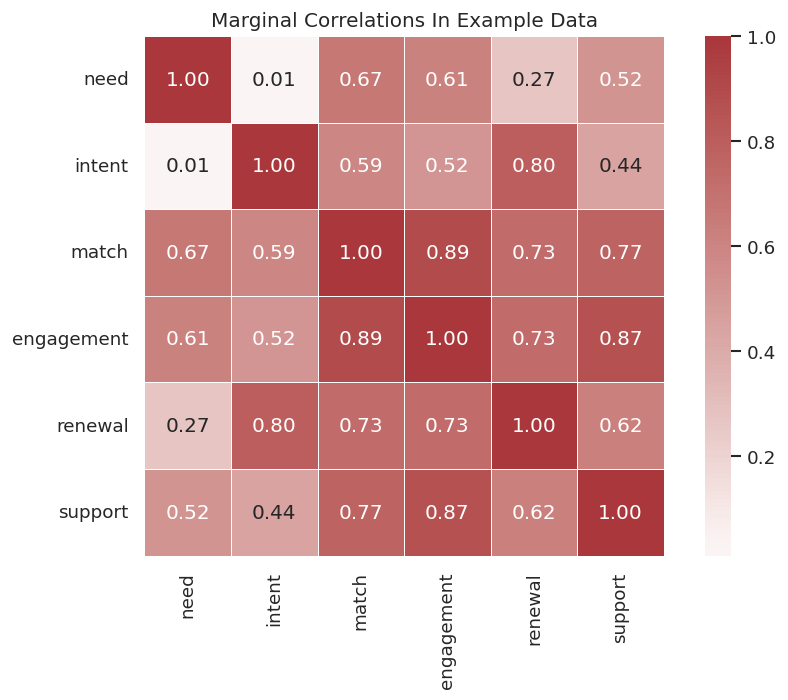
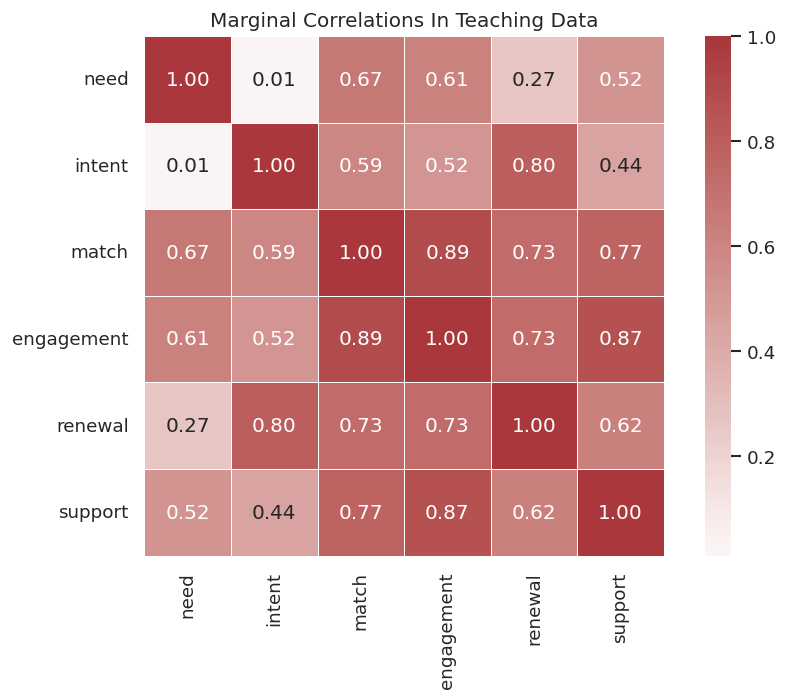
Marginal correlation serves a different role than causal discovery. It is still a useful first check. It shows which variables are strongly associated before conditioning on anything else.
The heatmap shows associations along causal pathways, but it cannot distinguish direct causes from indirect paths. PC will use conditional independence, more than marginal correlation.
Prepare the Data Matrix
Most causal-learn algorithms expect a NumPy array with rows as samples and columns as variables. We standardize the columns for a clean smoke test and keep the column order explicit.
The order in node_names matters because graph outputs refer to column positions. Passing node names into algorithms makes outputs much easier to read.
PC Algorithm Smoke Test
The PC algorithm is a classic constraint-based discovery method. It starts from a dense graph, removes edges based on conditional independence tests, and then applies orientation rules.
Here we use the Fisher-Z test because the data are continuous and generated from a linear Gaussian setup. This is a friendly first test, not a claim that Fisher-Z is always appropriate.
ifnot CAUSAL_LEARN_AVAILABLE:raiseImportError("causal-learn is not available. Install causal-learn before running the PC smoke test.")from causallearn.search.ConstraintBased.PC import pcpc_result = pc( data_matrix, alpha=0.005, indep_test="fisherz", stable=True, show_progress=False, node_names=node_names,)pc_edges = [str(edge) for edge in pc_result.G.get_graph_edges()]pc_edge_table = pd.DataFrame({"learned_edge": pc_edges})pc_edge_table.to_csv(TABLE_DIR /f"{NOTEBOOK_PREFIX}_pc_smoke_test_edges.csv", index=False)display(pc_edge_table)
learned_edge
0
need --- match
1
intent --> renewal
2
match --- engagement
3
engagement --> renewal
4
engagement --- support
The learned edges are the first proof that the environment is functional. The output may include directed edges and partially oriented or undirected edges, depending on what can be inferred from the data and assumptions.
Inspect the Raw Graph Matrix
causal-learn graph objects store endpoint information in a matrix. The exact endpoint coding is library-specific, so the safest habit is to pair the matrix with readable edge strings.
The matrix is useful for programmatic evaluation, while the edge strings are easier for humans. Later lessons will build more formal graph-conversion helpers.
For causal discovery, the result is a statement about recoverable structure under assumptions, not a free-standing proof of cause and effect.
Convert the Learned Graph to an Edge Table
For this first lesson, we convert the matrix into a simplified edge table with three edge types: directed, undirected, and partially marked. This is enough for a smoke-test comparison.
# Define reusable helpers for the Convert The Learned Graph To A Simple Edge Table section.def simple_edge_table_from_matrix(graph_matrix, names):""" Idea: Convert a small adjacency matrix into a readable edge table. Parameters ---------- graph_matrix : np.ndarray Adjacency-style matrix encoding the learned or known graph. names : list[str] Display names or variable names used to label outputs. Returns ------- pd.DataFrame Readable edge table converted from the adjacency matrix. """ rows = [] matrix = np.asarray(graph_matrix)for i inrange(len(names)):for j inrange(i +1, len(names)): a = matrix[i, j] b = matrix[j, i]if a ==0and b ==0:continueif a ==-1and b ==1: rows.append({"source": names[i], "target": names[j], "edge_type": "directed", "readable_edge": f"{names[i]} -> {names[j]}"})elif a ==1and b ==-1: rows.append({"source": names[j], "target": names[i], "edge_type": "directed", "readable_edge": f"{names[j]} -> {names[i]}"})elif a ==-1and b ==-1: rows.append({"source": names[i], "target": names[j], "edge_type": "undirected", "readable_edge": f"{names[i]} -- {names[j]}"})else: rows.append({"source": names[i], "target": names[j], "edge_type": "partially_marked", "readable_edge": f"{names[i]} ({a},{b}) {names[j]}"})return pd.DataFrame(rows)learned_edge_table = simple_edge_table_from_matrix(pc_result.G.graph, node_names)learned_edge_table.to_csv(TABLE_DIR /f"{NOTEBOOK_PREFIX}_pc_simplified_edge_table.csv", index=False)display(learned_edge_table)
source
target
edge_type
readable_edge
0
need
match
undirected
need -- match
1
intent
renewal
directed
intent -> renewal
2
match
engagement
undirected
match -- engagement
3
engagement
renewal
directed
engagement -> renewal
4
engagement
support
undirected
engagement -- support
The simplified table makes the graph output easier to compare to the known DAG. It also illustrates why graph-reading utilities are useful: raw graph objects are powerful, and reports need cleaner summaries.
Draw the Learned PC Graph
This plot uses the same layout as the true DAG so the differences are easy to spot. Directed edges are shown with arrows; undirected or unresolved edges are shown as dashed lines.
The learned graph should be close to the true graph because the data were designed for this method. Later lessons will show less friendly conditions where recovery becomes weaker.
Simple Graph Recovery Metrics
Because this is synthetic data, we know the true edges. The following metrics compare the learned skeleton and directed edges to the known graph. These are learning metrics, not the only way to evaluate discovery quality.
# Define reusable helpers for the Simple Graph Recovery Metrics section.def skeleton_set(edges):""" Idea: Convert directed edges into unordered pairs for skeleton-level comparison. Parameters ---------- edges : object Collection of graph edges to draw, compare, or convert into a table. Returns ------- set[frozenset] Unordered skeleton edge set for graph-level comparison. """return {frozenset(edge) for edge in edges}true_skeleton = skeleton_set(true_edges)learned_skeleton = {frozenset((row.source, row.target)) for row in learned_edge_table.itertuples(index=False)}true_directed =set(true_edges)learned_directed = { (row.source, row.target)for row in learned_edge_table.itertuples(index=False)if row.edge_type =="directed"}skeleton_tp =len(true_skeleton & learned_skeleton)skeleton_fp =len(learned_skeleton - true_skeleton)skeleton_fn =len(true_skeleton - learned_skeleton)directed_tp =len(true_directed & learned_directed)directed_fp =len(learned_directed - true_directed)directed_fn =len(true_directed - learned_directed)metric_table = pd.DataFrame( [ {"metric_family": "skeleton","true_positive": skeleton_tp,"false_positive": skeleton_fp,"false_negative": skeleton_fn,"precision": skeleton_tp /max(skeleton_tp + skeleton_fp, 1),"recall": skeleton_tp /max(skeleton_tp + skeleton_fn, 1), }, {"metric_family": "directed_edges","true_positive": directed_tp,"false_positive": directed_fp,"false_negative": directed_fn,"precision": directed_tp /max(directed_tp + directed_fp, 1),"recall": directed_tp /max(directed_tp + directed_fn, 1), }, ])metric_table.to_csv(TABLE_DIR /f"{NOTEBOOK_PREFIX}_pc_recovery_metrics.csv", index=False)display(metric_table)
metric_family
true_positive
false_positive
false_negative
precision
recall
0
skeleton
5
0
1
1.0000
0.8333
1
directed_edges
2
0
4
1.0000
0.3333
Skeleton recovery is usually easier than orientation recovery. That is not a weakness of the metric; it reflects the fact that some directions are not identifiable from observational conditional independencies alone.
Alpha Sensitivity
Constraint-based methods depend on the significance level used for conditional independence tests. The next step reruns PC across several alpha values and records how the graph changes.
need -- match; intent -> renewal; match -- engagement; engagement -> renewal; engagement -- support
1
0.0050
5
2
1.0000
0.8333
1.0000
0.3333
need -- match; intent -> renewal; match -- engagement; engagement -> renewal; engagement -- support
2
0.0100
5
2
1.0000
0.8333
1.0000
0.3333
need -- match; intent -> renewal; match -- engagement; engagement -> renewal; engagement -- support
3
0.0500
5
2
1.0000
0.8333
1.0000
0.3333
need -- match; intent -> renewal; match -- engagement; engagement -> renewal; engagement -- support
Even in a friendly setting, alpha is a modeling choice. A responsible discovery workflow reports sensitivity so readers can see how stable the graph is under reasonable choices.
Plot Alpha Sensitivity
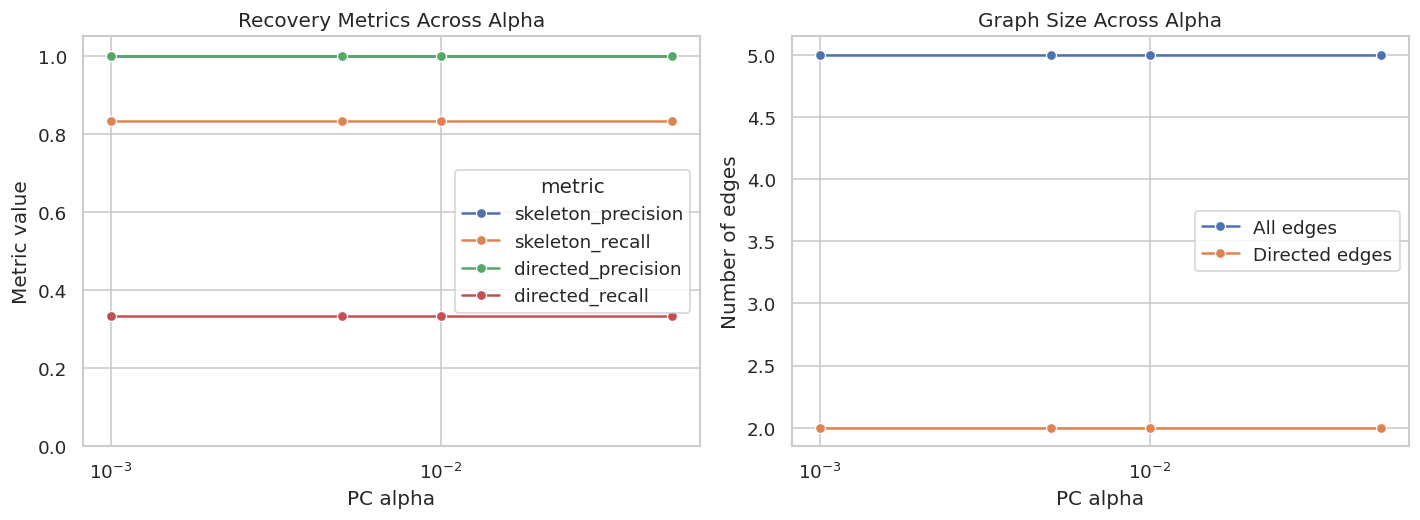
The next figure summarizes how precision, recall, and edge count change with alpha. This is a compact way to spot brittle graph recovery.
In this small example the graph is fairly stable, which is reassuring. In real data, a graph that changes dramatically across reasonable alpha values should be reported as unstable.
Independence-Test Intuition Check
PC is built from conditional independence tests. The code below gives a simple intuition check by comparing marginal and conditional relationships in the example data.
# Define reusable helpers for the A Tiny Independence-Test Intuition Check section.def residualize(target, controls):""" Idea: Remove linear variation explained by controls so the remaining signal can be used in a partial association check. Parameters ---------- target : str or array-like Outcome, metric, or variable whose transformed value is needed. controls : list[str] or array-like Covariates used to adjust, residualize, or condition the target. Returns ------- np.ndarray Residual vector after linearly adjusting the target for the controls. """ controls = np.asarray(controls)if controls.ndim ==1: controls = controls.reshape(-1, 1) controls = np.column_stack([np.ones(len(controls)), controls]) beta = np.linalg.lstsq(controls, target, rcond=None)[0]return target - controls @ betaneed_values = teaching_data["need"].to_numpy()intent_values = teaching_data["intent"].to_numpy()match_values = teaching_data["match"].to_numpy()marginal_corr = stats.pearsonr(need_values, intent_values).statisticconditional_corr_given_match = stats.pearsonr( residualize(need_values, match_values), residualize(intent_values, match_values),).statisticconditional_corr_given_match_engagement = stats.pearsonr( residualize(need_values, teaching_data[["match", "engagement"]].to_numpy()), residualize(intent_values, teaching_data[["match", "engagement"]].to_numpy()),).statisticindependence_demo = pd.DataFrame( [ {"relationship": "corr(need, intent)", "value": marginal_corr, "why_it_matters": "Root variables are marginally close to independent in the data-generating process."}, {"relationship": "corr(need, intent | match)", "value": conditional_corr_given_match, "why_it_matters": "Conditioning on a collider can create dependence."}, {"relationship": "corr(need, intent | match, engagement)", "value": conditional_corr_given_match_engagement, "why_it_matters": "Conditioning on descendants of a collider can also change dependence patterns."}, ])independence_demo.to_csv(TABLE_DIR /f"{NOTEBOOK_PREFIX}_independence_intuition.csv", index=False)display(independence_demo)
relationship
value
why_it_matters
0
corr(need, intent)
0.0102
Root variables are marginally close to independent in the data-generating process.
1
corr(need, intent | match)
-0.6398
Conditioning on a collider can create dependence.
2
corr(need, intent | match, engagement)
-0.6394
Conditioning on descendants of a collider can also change dependence patterns.
This small table shows why causal discovery is more subtle than correlation screening. Conditioning choices can create or remove associations depending on the graph structure.
Practical Startup Checklist
Before starting any causal discovery analysis, run a short checklist. This lesson creates a reusable version for the rest of the series.
check
why_it_matters
Data timing
Confirm every variable is measured at the intended time and does not include future leakage.
Variable roles
Decide whether variables are observed causes, outcomes, mediators, selection variables, or environment indices.
Data type
Choose methods and tests that match continuous, discrete, mixed, or time-series data.
Hidden confounding risk
Decide whether causal sufficiency is plausible; if not, consider FCI-style methods.
Sample size
Check whether conditional independence tests or score searches are realistic for the number of variables.
Domain constraints
Collect required or forbidden edges before looking at results when possible.
Sensitivity
Plan to vary alpha, scores, bootstrap samples, or algorithm families.
Reporting
State that the output is a candidate graph unless stronger validation is available.
The checklist is conservative. Causal discovery is powerful, but it can also produce very confident-looking graphs from weak assumptions.
For causal discovery, the result is a statement about recoverable structure under assumptions, not a free-standing proof of cause and effect.
Final Takeaways
By the end, four core ideas should be clear:
causal-learn is for learning candidate graph structure from data.
Method choice is assumption choice: PC, FCI, GES, LiNGAM, ANM, and other methods answer different discovery problems.
Partially oriented graphs are normal because observational data often cannot identify every direction.
Every discovered graph needs sensitivity checks and domain review before it supports effect estimation or decisions.
The sequence next goes deeper into graph objects, DAGs, CPDAGs, PAGs, edge marks, and graph evaluation metrics.